Below you will find all common 4th gen (93-2002) headlight failures/problems that might occur. Please read the below carefully and if you have a Firebird, bookmark this page because it is not IF but WHEN you will see one or more of the below.
1) The most common problem with the headlight motors is the nylon gear failure. The motors are very durable… everything else is not. Take a look below for extensive details about the gear failure that causes the motor to continue to run for about 5 seconds and make a terrible grinding noise.
2) While the nylon gear in the housing is a poor design and often times just fails on its own, there is a contributing factor that can cause the nylon gear to fail prematurely and even cause hard coated aluminum gears to fail. Yep, you read that correctly… this can cause even a metal brass gear to fail. This is crucial so pay attention here closely. This is very common and most likely leads to 25% or so of the nylon gear failures. What I’m talking about and what happens is the metal motor housing comes loose on the plastic gear housing. The metal motor housing of the headlight motor assembly is held tightly to the plastic gear housing by four metal tabs. Over time, these tabs can come loose and often do. You can easily check for this by either a) with the hood open have somebody cycle the lights. If you see the headlight motor wobble as the light goes up/down, this is NOT good and your motor housing is loose on the gear housing. Another way to check for this is b) to reach down in there with the hood open, grab the metal motor housing, and see if you can wiggle it. You should NOT be able to wiggle it. The metal motor housing is securely fastened to the plastic gear housing which is securely fastened to the car. If you can wiggle the motor housing then you should be moving the entire car and that is not likely. You have to be careful, however, of checking it like this because if it is loose enough, what happens when the light is in the full up or down position there is such a huge binding force on the motor and gear that it will feel tight!!! To ensure this is not masking the motor housing being loose, you can use the manual raise/lower knob and raise the headlight about an inch as this will take the bind off the motor and gear and will allow you to check to see if it is tight. I can’t stress enough that if this motor housing is loose on the gear housing, you are doomed for a gear failure. You should fix this immediately by removing the headlight motor assembly from the car and pounding the tabs back down tight. This is very important and if you are buying the brass gears, it is important to check this and pound the tabs down tight before installing the motor back in the car. If you don’t, once it gets loose enough even the brass gear will fail. Since you are probably wondering just how a brass metal gear can fail, I’ll quickly explain. What happens when the motor operates is there is an huge amount of force/torque placed on the motor housing. It is trying to force the worm drive of the motor away from either the nylon or brass gear (if you’ve already replaced it). With everything tight as it should be, there is no movement and you can’t actually “see” this force taking place… everything stays tight and the worm drive teeth of the motor are planted firmly in-between the teeth of either the stock nylon gear or the brass gear. As the motor housing loosens on the gear housing, this force/torque will become evident because you will be able to see the motor “tilt” on the gear housing. As the motor tilts the worm drive teeth of the motor are no longer firmly seated in the teeth of the nylon or brass gear. Once it becomes loose enough and the tilt is great enough, you’ll have only the very tips of the worm drive making contact with the very tips of the teeth of the nylon or brass gear. Due to the large amount of force necessary to open these heavy headlight doors, just the tips of the teeth making contact will cause the nylon/brass gear to slowly fail and get “chewed up”. Now, you might wonder how a brass gear can get chewed up? Picture trying to chop down a tree in your back yard with a pocket knife and one swipe of the pocket knife at the tree… it isn’t going to happen. However, if you take that pocket knife and whittle away at the tree, you will slowly be able to go completely through the tree. Same thing happens with the brass (or nylon) gear… the very tips of the worm drive shave away at the very tips of the brass gear and this is how even a metal gear can fail. So, it is very important that ALL you Firebird guys watch for this because it doesn’t matter if your headlights are working perfectly now and have never been replaced or if you bought brass gear like 6 months ago and it is working perfectly… if these tabs come loose and the motor starts to wobble, it is only a matter of time before you will have a gear failure. So, by fixing this early, you can possibly prevent a gear failure, and, if you are still on the stock nylon gear, maybe even prolong the time until it ultimately fails.
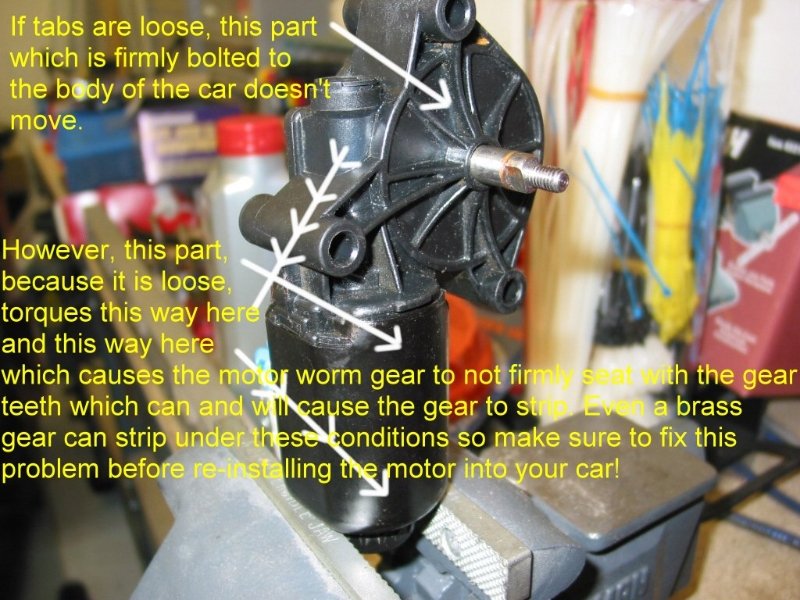
Description of how the motor worm gear torques away from the nylon or brass or hard coated aluminum gear and causes the gear to strip.
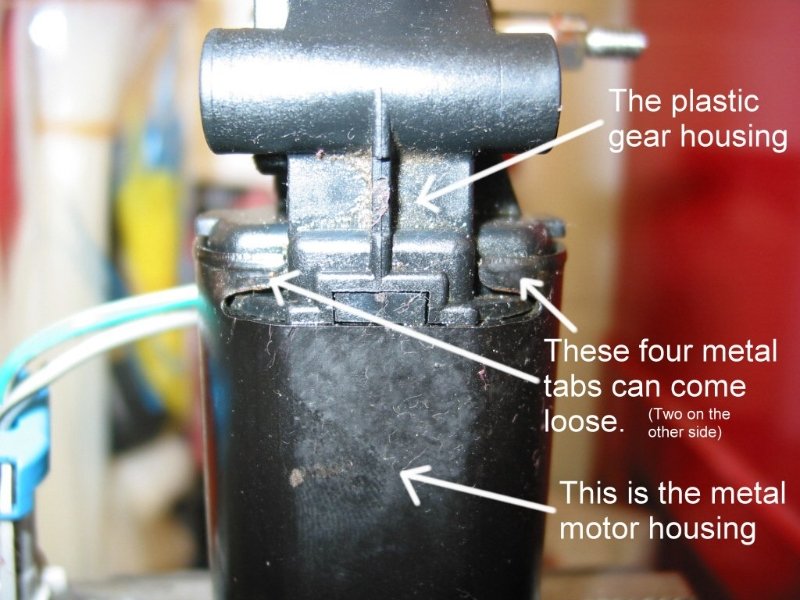
Picture showing the plastic gear housing, metal motor housing, and tabs which hold the two together.
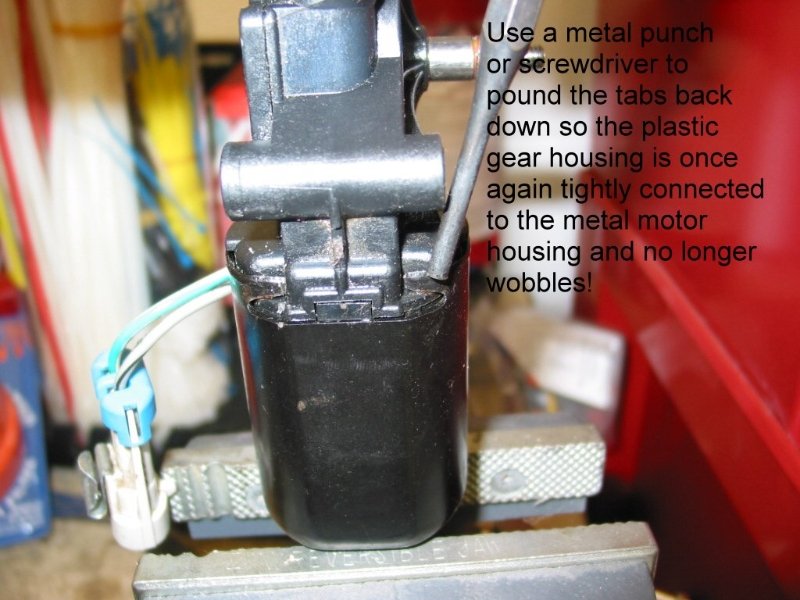
Picture showing the use of a punch to pound these tabs back down so the metal motor housing will no longer wobble on the plastic gear housing. This is a MUST DO prior to re-installing the headlight motor assembly back into the car to prevent future problems!
3) The headlights cycle open and closed when they shouldn’t. For example, when arming or disarming the alarm or just turning on the fog lights or parking lights, the headlights will cycle or go up but not on. This is actually 100% related to the stripped gear. In every case where I have heard of people complaining about the lights cycling or coming up when they shouldn’t, they also have the problem of the stripped gear as mentioned above. The good news for you is that once you fix the stripped gear problem either by the temporary free fix mentioned below or by getting one of brass gears, this problem will magically disappear as well 🙂 What happens I believe is the stripped gear kinda “freaks out” the headlight control module so to speak. The control module doesn’t know if it is coming or going so the lights do strange things. Fix the gear and the lights will go back to working normally for you again.
4) The headlight just won’t go up at all and it seems like the motor is shot. This could actually be a couple of things. The easiest thing and is actually quite common is that the headlight motor connector gets very corroded. There ends up being so much corrosion in there that 12v can no longer make it through the corrosion to the headlight motor and it just quits working. Unplug the connector near the headlight motor and check the connections. Normally it will be very easy for you to see this corrosion as the connector may even appear burned or slightly melted due to the heat caused by the high resistance just prior to it completely not working. This is an easy check and is free so look at this first if your light doesn’t move at all.
5) The headlight won’t go up or once up, the headlight will not lower. If it is not the corroded connector like mentioned above then it could be the light is getting jammed in place. This can happen with either the nylon or brass or hard coated aluminum gears. I’m not 100% certain what causes it but it does seem to be related to some moving part in the headlight assembly wearing. It does seem to happen primarily on older Firebirds or ones where the lights get a lot of use so I do believe it is caused by something wearing which causes the light to get jammed in place. A lot of people will just raise the hood, spin the manual raise/lower knob a couple times, and then the light will go up/down. This fixes the problem but only for that one cycle and that is no good. The good news though is that I can explain a fix to ya that seems to work most of the time. What you can do to help prevent the light from getting jammed is to STOP it a little early. This will help to prevent the light from getting jammed. You can do this by making the stops which the raise/lower arm make contact with a little larger. Since they are molded into the plastic front headlight frame, just putting a larger one on isn’t an option. But, what you can do is something fairly simple. It might require a little trial and error but the fix will be easy and cheap. What you need to do is put some thick and fairly firm rubber tubing/hose over the stop. The tubing/hose has to have an inside diameter such that it will fit snugly on the existing stop or it will fall off 🙂 What this will do is make the raise/lower arm make contact sooner which means that the light will not go up (or down) quite as far and thus, hopefully, prevent it from getting jammed in place. If you try this and find that it didn’t work for you, it is possible your tubing/hose is too soft or not thick enough. If too soft, get a harder hose. If not thick enough you can either replace it with a thicker piece of tubing/hose or you can add another piece of tubing/hose over the existing one to make it thicker which will stop the light even sooner. I don’t know what size is best for this. There are so many brands and sizes out there that it would be impossible for me to list what works. What you can do though is take a look down in there and locate these stops. Use a pencil or bolt or whatever you have that is about the same size. You can then go to Home Depot or a hardware store and go to the tubing/hose section and get a few pieces like 6″ or 1′ long or however short they’ll allow you to purchase. You should be able to get several sizes and hunks to experiment with for just a buck or two and have more than enough to do both your lights.
5a) On a side note and kinda related to problem 5 above is that you may find that you experienced the light getting jammed. Knowing that these lights have a raise/lower knob associated with them, you used the raise/lower knob to get the light started and then cycled them electrically and they worked. However, right after you did this when the light went down, you heard the terrible noise of a stripped gear. Bummer. What I believe happens and I’ve heard of it a couple of times is that what happened is some teeth on the nylon gear actually BROKE and that is what caused the light to jam in place. Then, after the next cycle of the light the stripped gear with the broken teeth became obvious by the grinding noise.
6) Here is a strange one… does one of your lights go down and then immediately pop back up? If so, read on. That is the most common of this symptom but it could go up and then immediately back down too! If you read above, I talked about the two stops associated with each light. One stop will stop the light in the up direction and the other stops the light in the down direction. If you look down in there and at the raise/lower arm on a properly working light, you’ll see that the raise/lower arm is making contact with one of these stops. Well, if you are having the problem of your light cycling up and then back down or down then immediately back up when you operate your lights, what has happened is one of these stops has broken off!!! On the light that is going down then immediately back up, you’ll see only one stop 🙂 To fix this isn’t easy but isn’t all that hard either. Because these stops are actually molded right into the front headlight support assembly, replacing the stops means replacing this entire piece and that is big $$$. You probably don’t want to spend that much and I don’t blame you! Good news is that you can make your own stop. What you need to do is drill out the area where the stop used to be then using a bolt and nut or nuts, make your own stop! I have never done this myself and only suggested to people to do it so I don’t know what the best size to use is. Size isn’t overly important here… just so long as it sticks out there far enough to make contact with the raise/lower arm but not so far as to cause interference with the operation of the light. Also, keep in mind, that if you were having problems with the light jamming in place, that you can use a bigger nut/bolt which will cause the light to stop a little sooner and thus help to prevent the jamming of the light… killing two rabbits with one shot!
As with all things electronic, something has to control it! With these headlights there is a headlight control module located behind the driver side headlight. It is what sends the juice and kills the juice (in more technical terms… 12 volts DC!) to the headlight motors. Junk yards sometimes get $50 to $75 for them. If you have tried all the above and just can’t figure out why one of your lights is not working, it might be the control module but it is highly unlikely. If you have taken your car to a dealer it is likely they rattled off the top of their head that you need a control module and that “should” fix all your problems. Well, in this area, they are clueless. The headlight control modules on these cars hardly ever go out so definitely do not plunk down a couple hundred bucks first thing just because the dealer says so. The dealer will often tell you to replace this module when the lights go down and then immediately back up as described in 6) above. This is a big money maker for them as well because the parts department at least marks it up double what it costs them (usually) and then they charge you big $$$ to change it when it really takes about 3 minutes for the average backyard mechanic to swap one of these out. So, be warned, while the control module might be your problem, I say it is very unlikely and something else is causing your headlight motors to not work properly.